The new McKnight – “HOLLOW BACK” design will debut at the Healdsburg Guitar Festival.
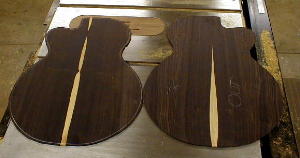
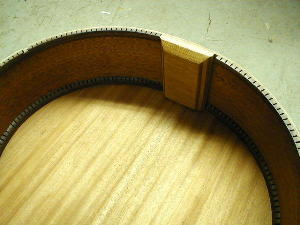
My new back design uses two backs, an outer back and an inner back. When you look into the sound hole you will not see any back braces, instead you will see a very smooth and clean reflective inner back surface.
The conventional back uses a series of braces glued to the back to maintain the arch of the back. The basic back design has not changed much in over a hundred years. Luthiers knew there were gains to be had in tuning the back to be slightly out of phase with the top. We have played with back thicknesses and altered the bracing patterns to try to get more active coupling action with the top or went to the opposite extreme of making the back thicker and stiffer to act as a passive reflector.
When the player holds the guitar away from their body the back is free to vibrate and actively couple with the top. Classical players have known and used this technique for years but it has been slow to catch on in the steel string circles. However, when the player holds the guitar’s back against their body the back is dampened and the back becomes inactive and acts as a passive and inefficient reflector.
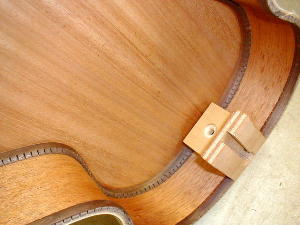
Enter – The McKnight “HOLLOW BACK” design: The player can hold the outer back away from [or] against their body and the INNER back is still free to vibrate. It is not affected by the outer back being dampened by the player’s body. The inner back is separated from the outer back by a unique internal bracing pattern that provides the structural strength to maintain and support the outer back arch and it still allows the inner back to freely vibrate.
OK, enough of the technical stuff – What is the benefit for me as a player? More volume, power, projection and sustain with the same amount of string attack. The inner back surface is extremely smooth and there are no braces on the surface to impede vibrating air molecules. The McKnight “HOLLOW BACK” is simply more efficient with less power loss as compared to a conventional braced back design.
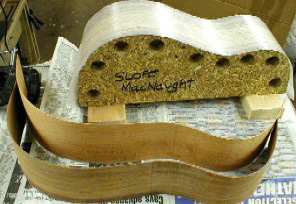
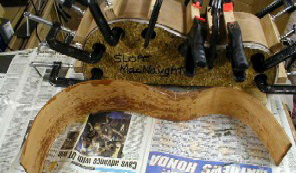
It starts with two backs, an inner back and outer back.
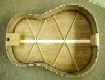
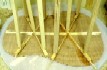
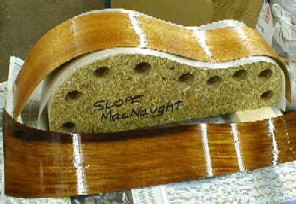
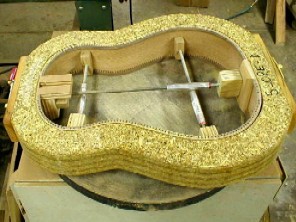
Then they are joined together with a unique internal bracing system. Just put on your X-Ray glasses to see it 😉
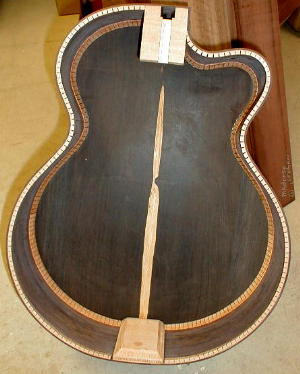
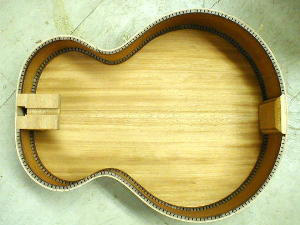
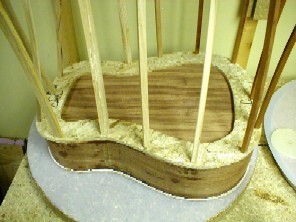
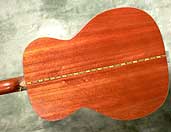
Here are some other pictures of the new McKnight “Hollow Back” design:
At this point, the new “Hollow Back” design will remain an option under my current pricing structure.
Another added benefit of the new “Hollow Back” is used in the design phase. Let’s say that a customer comes to me and says that they absolutely love the appearance of a highly figured flamed maple guitar but they can’t stand the tone of it, they really wish it could sound like East Indian Rosewood. Enter > the McKnight “Hollow Back” design. I would use flamed maple on the exterior and use EIR on my “Double Sides” and EIR on the inner “Hollow Back”. The outside will look like a maple guitar but the wood on the inside is what colors the tone of the top and the guitar will sound like it is made from EIR. Pretty cool, eh?
Yeah, but what about the weight? Wouldn’t this guitar be extremely heavy? No, because my goal is to build a really light and responsive guitar. Even though I use the new standard “Double Sides” along with the new “Hollow Back” option the wood is extremely thin and about the same weight as a standard guitar. The only added weight is that of a special structural adhesive that I use in both processes.
What about the longevity of the new designs? My prototype is two years old and it has withstood the harsh dry winter conditions along with extreme humidity swings that we experience here in central Ohio. The back arch has not moved a fraction of an inch. I have carefully monitored it on a routine basis to see if it would move under extra conditions and it has passed my grueling tests. As always, my guitars carry a lifetime warranty (as long as I am physically able to honor it). Rest assured, if I thought this design was risky I would not put my name on it unless I thought it to be a huge benefit for the acoustic guitar enthusiast. I have several of these guitars in the hands of VERY happy customers and I have asked them to keep this new technology under wraps until now.
Please stop by our table or booth when we exhibit at the Healdsburg Guitar Festival, Montreal Guitar Show , Newport Guitar Show in South Florida , IBMA or SPBGMA shows in Nashville, TN to test drive the new Double Sides and Hollow Back McKnight Guitars .
Each “Standard” McKnight guitar back is braced with Sitka Spruce, Red Adirondac Spruce or Honduras Mahogany to retain its 15-foot radius. Center seams are also reinforced with quarter sawn Spruce. All joints are glued with hot hide glue to transmit the optimal energy to the top and back plates.
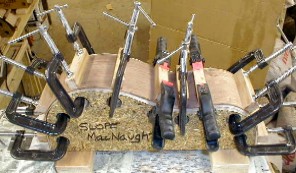
I use an ingenious but simple clamping system called a “Go-Bar Deck.” The wood being glued is held under precise clamping force below an upper deck by means of several bowed wooden rods.
Tops are book-matched, candled, and joined with hot hide glue. The rosette is installed and thickness-sanded.
I use my own unique top bracing pattern. This is a much freer bracing design than that commonly used by others, which supports the neck and fingerboard extension in such a manner that the top is better able to withstand the pulling force exerted by the strings. To the player, this means more stable and consistent action and reduced truss rod adjustments as the instrument matures. I have never had a guitar returned for a neck reset so this supports my decison to continue this upper bout bracing pattern.
Bridge plates are rift sawn hard Maple, Brazilian Rosewood, Honduran Rosewood, Paudauk or Osage Orange, depending on the tone I am trying to achieve for the player. Lately I have been using a Paudauk/Brazilian RW or Wenge/Brazilian laminated bridge plate. This new design offers superior tone, wear resistance and is extremely stable and virtually crack proof.
McKnight braced tops start with an X-style bracing pattern with a varying X angle dependant on the tone the customer desires. [Sorry, but I am not posting any pictures of it because it is proprietary in design]. Each smaller brace is “coupled” to the main X brace and glued in place using hot hide glue to allow the top to function as an engineered system. The mechanical coupling allows the brace design to function as a conduit system to transfer vital vibration energy from the central point of excitation (the bridge) and the vibration energy is evenly dispersed over a wider area of the top. The final step is to shape each brace to achieve the optimal balance of tone and volume without sacrificing structural integrity. The top is placed in a specialized fixture and each brace is carved to produce the optimum tone in each quadrant of the top. The voicing process is very slow, tedious and yet methodical yielding the desired tone that the customer has requested. Next the braces are final shaped and sanded to a 320 grit degree of smoothness. Lastly the top (interior surface) is sealed with a thin wash coat of shellac. This adds stiffness and also retards the exchange of moisture from the wood. This allows the guitar to handle humidity changes in a more even and controlled manner.
Sides are bent in a special Fox-style side bending machine. The sides are precisely thickness sanded on a wide belt sander, then spritzed with de-ionized water. The side pairs are then sandwiched between two stainless-steel pre-heated slats and placed in the bender. The waist is bent first, then the upper and lower bouts are bent and clamped to conform to the desired shape. The bender is set to “cook” the wood for fifteen minutes, and then is turned off to cool overnight. The sides are “cooked” for an additional fifteen minutes the following day, to remove any harmful excess moisture and to set the side shape permanently. The bender is allowed to cool and the sides are removed. This process provides two identically shaped sides with absolutely no tension in the wood. The wood will now be stable and retain this shape for the rest of its life!
I no longer use wooden strips or glue-soaked cloth strips along the inner sides to prevent cracks or stabilize the sides. My new “DOUBLE SIDES” are now fabricated from FOUR individual sides and then laminated with epoxy glue, in a form under extreme pressure. This process prevents the DOUBLE SIDES from cracking and also provides an extremely stiff rim set to rigidly support the top and back vibrating plates.
I prefer to use complimentary figured hardwood binding on all of my guitars for a pleasing aesthetic package. Plastic binding has its place if the guitar will be used in a professional road life situation where maximum protection from abuse is required. My hardwood binding is bent in the same manner as the DOUBLE SIDES to retain their shape and eliminate any tension in the sound box.
I use genuine Honduras Mahogany, Spanish Cedar< Wild Black Cherry or Black Walnutfor my own reverse kerfed linings because it is known for its stability, strength and lightness. I install my linings “backwards” as compared to most builders. This has no effect on sound, but makes a more rigid DOUBLE SIDE rim set and produces a clean finished look inside of the instrument. When you look in through the sound hole of a McKnight, you will not see all of those rough looking saw kerfs in the lining that are common in many guitars. Instead, my lining has a smooth, pleasing and finished appearance.
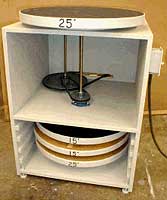
Once the DOUBLE SIDE sets are assembled, it’s time to sand the proper angle on the top and back kerfed lining surfaces. I use an abrasive-covered concave sanding dish in a motorized fixture to sand the top edge to a 30 foot radius. The back kerfed lining surface is sanded to a 15 foot radius and the top to a 30 foot radius. These precisely sanded surfaces produces a perfect joint when I glue the 30 foot radius top and the 15 foot radius back on the laminated DOUBLE SIDE set. I make every effort to eliminate ALL tension or stress in every joint of the guitar. If a joint doesn’t fit perfectly in the build process, it will constantly be under tension or compression, which will ultimately lead to failure of the joint and loss of energy. I build McKnight guitars right the FIRST time.
Back to the “Go-Bar Deck” to glue the back and top onto the DOUBLE SIDE rim set. I use hot hide glue in each joint to provide the maximal string energy transference to both top and back plates. Hide glue is very strong and VERY HARD when it dries. White glues will hold well, but they don’t get as hard as hide glue does, so there is energy lost in a joint by using such a soft glue.
After the sound box is assembled, it’s time to cut the groove for the binding. I prefer not to use plastic binding as it is too soft and dampens tone. By using hardwood bindings, less vibration or string energy is lost through this type of joint, allowing more string energy to reach the soundboard and back plate. Compare the sound of a plastic-bound guitar and a wood-bound guitar and you WILL hear a difference. Plastic bends easily, glues well, scrapes and sands easily, but TONE and ENERGY ARE LOST. I strive to build the best-sounding instruments available and I prefer not to compromise my standards with plastic bindings unless the customer requires them.

Hardwood bindings are glued with hot hide glue and held in place for twenty-four hours with a special grade of masking tape.
![]()
It’s time to fit the neck to the body. This is NOT fun! This process is time-consuming but it is probably the most important step when building a guitar. The neck has three planes that must be accurately adjusted: up and down; side to side; and twist. A few thousandths of an inch of wood must be removed from the neck joint and the neck test fit to get the correct angle in all three planes. This will ultimately affect the playability and intonation of the guitar. I have spent up to eight hours on a neck set-up before I got it aligned perfectly. Unfortunately, there are no shortcuts in this step of the process. Again, hot hide glue is used in this joint.

I am now ready to cut the cavity and inlay the McKnight logo. The letters are cut out of two pieces of Mother of Pearl (MOP) shell using a jeweler’s handsaw and a magnifier headset. The logo is then held on the head stock and traced around with a dental pick. A Dremel Moto-tool, mounted to an adjustable router base, is used to rout the cavity. The inlay is then glued in place, using two-part epoxy glue mixed with Rosewood or Ebony wood dust. After the glue has dried overnight, I scrape the surface flush, using a cabinet scraper.
The entire guitar is sanded in successive stages, to a 320 grit degree of smoothness. The guitar is sealed with natural de-waxed shellac and then grain filler is applied. The guitar dries for seven days, is block-sanded, and then sealed again. I don’t normally use stains unless requested by the customer. My philosophy is that God grew the wood the way He wanted it to look, naturally, and that’s the way I like to finish it, naturally. The finishing process begins by spraying instrument-grade, two part, catalyzed urethane lacquer. Lacquer dries very hard and efficiently transfers the sound. The finish also has the ability to be flexible enough to react to the changes the wood during the seasons without cracking. Five to six coats are typically applied to the top, sides and back.
After the final coat has been sprayed, the finish must cure and harden for fourteen days. The entire guitar is wet-sanded with wet-or-dry sand paper. Following that, it is allowed to cure for another week. The guitar finish is then buffed on a power buffer with fine-buffing compound, and once again with extra-fine compound, to achieve a glass-smooth, mirror-like DEEP finish.
The neck is now attached to the buffed body. The fingerboard is now leveled and the frets are installed. I use nickel-silver medium-gauge frets. Again, hot hide glue is used to make sure the frets have the best contact with the fretboard. I strive to capture and retain ALL of the strings sound energy possible in the complete guitar system.
The neck is now attached to the buffed body. The fingerboard is now leveled and the frets are installed. I use nickel-silver medium-gauge frets. Again, hot hide glue is used to make sure the frets have the best contact with the fretboard. I strive to capture and retain ALL of the strings sound energy possible in the complete guitar system.
